
If you have a sage plant producing more leaves than you can use fresh, drying sage is one of the easiest ways to preserve your harvest.
This post may contain affiliate links.
Dried sage is wonderful for seasoning roasted vegetables, chicken, pork, stuffing, soups, sauces, and all kinds of cozy fall recipes.
And because sage is such a hardy herb, it dries beautifully while keeping its distinctive earthy flavor.
Whether you have sage growing in your garden or in a container, you can dry it using a few simple methods.
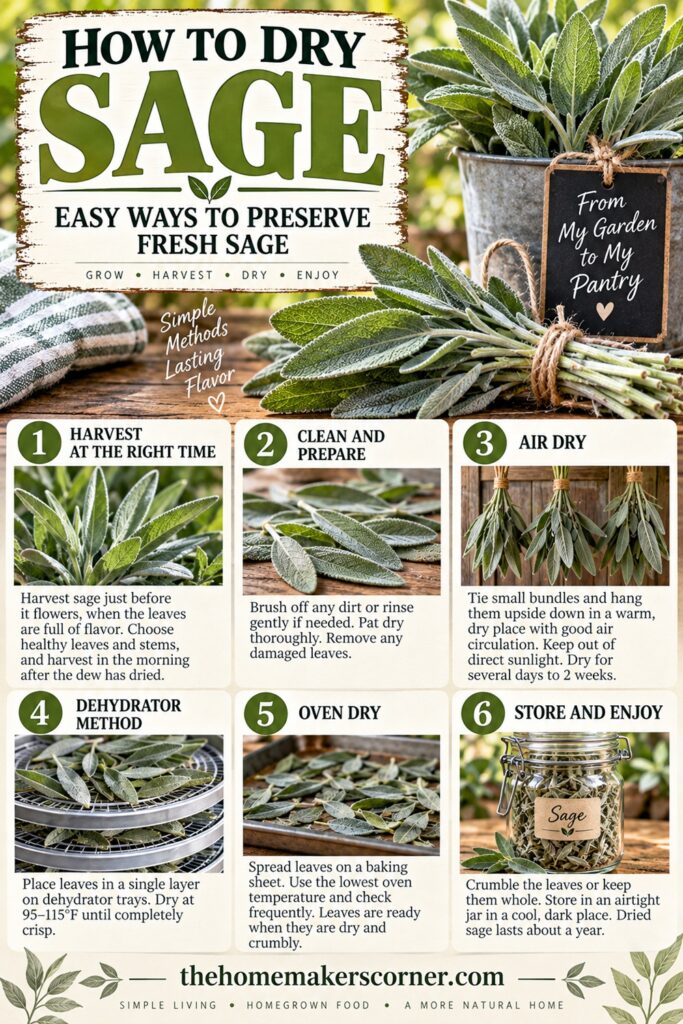
When to Harvest Sage for Drying
The best time to harvest sage for drying is just before the plant flowers, when the leaves are full of flavorful essential oils.
Harvest in the morning after the dew has dried but before the heat of the day.
Choose healthy, undamaged leaves and stems. If your sage plant is large and established, you can cut several stems at once rather than picking individual leaves.
Want to try making your own jelly at home?
Get my free guide with 8 easy, beginner-friendly jelly recipes you can confidently make.
If you are growing sage in a container, you can harvest small amounts regularly to encourage fresh growth.
Related: How to Grow Sage in Pots
How to Prepare Sage for Drying
If the sage leaves are clean, you can simply brush away any dirt or debris.
If you need to wash them, rinse them gently under cool water and pat them thoroughly dry with a clean towel. It’s important to remove as much moisture as possible before drying.
Wet leaves take longer to dry and can develop mold if there isn’t enough air circulation.
Once the sage is dry, remove any damaged or discolored leaves.
3 Easy Ways to Dry Sage
There are three simple methods I like for drying sage:
- Air drying
- Using a food dehydrator
- Oven drying
The best method depends on how much sage you have and how quickly you want it dried.
1. Air Drying Sage
Air drying is probably the simplest method if you have a dry, well-ventilated place in your home.
Gather several sage stems together and tie them loosely at the bottom with string or a rubber band.
Hang the bundles upside down in a warm, dry place away from direct sunlight.
A pantry, unused room, or covered porch can work well as long as the area is dry and has good air circulation.
Don’t make the bundles too large. Smaller bundles allow air to circulate around the leaves and help prevent moisture from becoming trapped inside.
Depending on humidity, sage can take anywhere from several days to a couple of weeks to dry completely.
How Do You Know When Sage Is Dry?
The leaves should feel crisp and crumbly when they are completely dry.
If the stems still bend easily or the leaves feel soft, give them more time.
Once they’re completely dry, gently strip the leaves from the stems.
2. How to Dry Sage in a Dehydrator
A food dehydrator is my favorite method when I have a large harvest because it gives you more consistent results.
Remove the sage leaves from the thicker stems and arrange them in a single layer on your dehydrator trays.
Dry the leaves at a low temperature, around 95–115°F, until they are completely crisp.
The exact drying time will depend on the moisture in the leaves and your particular dehydrator.
Check the sage periodically. You don’t want to cook the leaves; you simply want to remove the moisture.
3. How to Dry Sage in the Oven
If you don’t have a dehydrator, you can dry sage in the oven.
Spread the sage leaves in a single layer on a baking sheet.
Set your oven to its lowest possible temperature. If your oven runs hot, leave the door slightly cracked so moisture can escape.
Check the leaves frequently. Sage leaves are thin and can dry fairly quickly.
They’re ready when they are completely dry and crumble easily between your fingers.
How to Store Dried Sage
Once your sage is completely dry, gently crumble the leaves or leave them whole.
I prefer to keep dried herbs as whole as possible until I need them because they tend to retain their flavor and aroma better that way.
Store dried sage in an airtight glass jar with a tight-fitting lid.
Keep the jar somewhere cool and dark, such as a pantry or cupboard. Avoid storing dried herbs in direct sunlight or next to the stove.
Don’t forget to label the jar with the herb and the date you dried it.
How Long Does Dried Sage Last?
Properly dried and stored sage can last for about a year, although the flavor will gradually become less intense over time.
Before using older dried sage, give it a quick smell. If it still has a strong herbal aroma, it’s ready to use.
If it has very little scent left, it’s probably time to replace it.
How to Use Dried Sage
Dried sage is especially good in hearty recipes and is one of my favorite herbs for fall and winter cooking.
Try it in:
- Roast chicken
- Pork chops
- Sausage
- Stuffing and dressing
- Roasted potatoes
- Winter squash
- Soups and stews
- Beans
- Gravy
- Homemade seasoning blends
- Herb butter
- Pasta sauces
You can also combine dried sage with other herbs from your garden to make your own homemade seasoning blends.
And if you have several herbs growing in your garden, there’s no reason to stop with sage.
More herbs to dry:
- How to Dry Tarragon
- How to Dry Thyme
- How to Dry Parsley
- How to Dry Oregano
- How to Dry Dill
- How to Dry Basil
- How to Dry Mint
- How to Dry Rosemary
Growing and Caring for Sage
Drying sage is even more satisfying when you’ve grown it yourself.
Sage is a great herb for a kitchen garden and works particularly well in containers.
More sage growing tips:
Growing sage alongside other Mediterranean herbs can also create a beautiful, useful herb garden. Herbs such as thyme, rosemary, and sage have similar growing preferences and make attractive companions.
If you have a healthy sage plant, don’t let all those extra leaves go to waste.
Harvest some for fresh cooking and dry the rest for your pantry. Once you have a jar of homegrown dried sage on hand, you’ll find plenty of ways to use it throughout the year.
It’s one of those simple garden-to-kitchen projects that makes growing your own herbs so worthwhile.
Follow my kitchen garden living board on Pinterest.