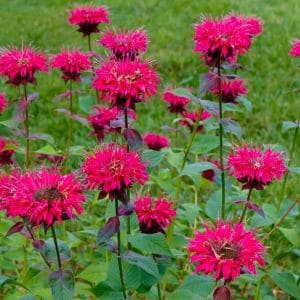
If you want to enjoy bee balm beyond its blooming season, knowing how to harvest and dry it properly is key. The best way to harvest bee balm is to cut the stems just as the flowers begin to open, then hang the bunches upside down in a dry, well-ventilated spot to dry. This helps keep the fragrance and flavor strong.
This post may contain affiliate links.
Drying bee balm the right way lets you use it for tea, cooking, or homemade remedies throughout the year. You’ll find that with the right timing and drying method, your bee balm stays fresh longer and keeps its natural aroma.
You’ll also learn a few tips to make sure your dried herb stays free from mold and loses none of its benefits. With a little care, your bee balm can be a tasty and fragrant addition to your pantry for months to come.
Related Article: How to Make Bee Balm Tea for a Refreshing and Soothing Drink
How to Harvest Bee Balm
To get the best flavor and aroma from your bee balm, timing, tools, and technique matter. You’ll want to pick the leaves and stems carefully to keep the plant healthy and make drying easier.
Related Article: How to Deadhead Bee Balm for Healthier, Longer Blooms
Identifying the Best Time to Harvest
Look for bee balm leaves just before they start turning yellow or wilting. This is usually in late summer or early fall. At this stage, the leaves hold the strongest flavor and fragrance.
The best time of day to harvest is in the morning after the dew has dried. This helps preserve the plant’s essential oils, which give bee balm its special scent and taste.
Cut the stems once a few flowers have just started to open. This ensures you get the most potent leaves and flowers. Avoid harvesting after heavy rain or intense heat to protect the quality.
Related Article: Top 5 Mistakes to Avoid While Growing Bee Balm for a Vibrant, Healthy Garden
Choosing the Right Tools
Use clean, sharp garden shears or scissors to cut your bee balm. Dull tools can crush the stems and leaves, hurting the plant and reducing the quality of what you harvest.
Before you start, clean your tools with rubbing alcohol or warm soapy water. This prevents spreading any diseases between plants.
Make sure your tools are easy to handle and comfortable for you. This will make the job safer and smoother, especially if you are harvesting many plants.
Related Article: How to Grow Bee Balm from Cuttings: A Step-by-Step Guide
Proper Harvesting Technique
Cut bee balm stems about 4 to 6 inches from the top. Avoid cutting too low or too close to the root, so the plant can keep growing.
Related Article: Bee Balm 101: The Pollinator Plant Every Garden Needs
Harvest leaves and flowers selectively. Focus on healthy, vibrant parts of the plant and avoid any spots that look damaged or diseased.
Gather the stems in small bunches and hang them upside down in a cool, dry place with good airflow. This method helps the leaves dry evenly without losing flavor.
Try not to strip all the leaves from one plant at once. Leave some behind to help the plant stay strong and produce again later.
Related Article: The Best Time to Cut Back Bee Balm (and Why It Matters)
How to Dry Bee Balm
Drying bee balm properly helps keep its flavor and aroma strong. You’ll want to prepare the leaves and stems carefully, choose the right drying method, and store the dried herb so it stays fresh for months.
Preparing Bee Balm for Drying
Start by harvesting healthy leaves and stems. Choose the upper parts of the plant and avoid any damaged or yellowed leaves. Harvest in the late morning after the dew has dried for the best flavor.
Rinse the stems gently using cool water to remove dirt or bugs. Pat them dry with a clean towel or let them air dry for a bit. Remove any flowers if you only want the leaves to dry faster.
Tie several stems together using string or rubber bands. Keep the bunches small, so air can circulate well around each leaf.
Air Drying Methods
Air drying is a simple way to dry bee balm if you have a dry space. Hang your tied bunches upside down in a well-ventilated, dark room.
Avoid direct sunlight because it can fade the color and reduce the herb’s scent. A warm room with a temperature around 70°F is best. It usually takes about 1-2 weeks for the leaves to dry completely this way.
Once the leaves feel crisp and crumble easily, your bee balm is ready for storage.
Using a Dehydrator
If you want faster drying, a dehydrator works well. Lay the bee balm leaves and small stems in a single layer on the trays.
Set the dehydrator temperature to about 95-115°F. Drying should take 1 to 4 hours depending on the thickness of the stems and leaves.
Check every hour to avoid overdrying, which can make the leaves brittle and lose flavor. When dry, the leaves will snap easily or crumble.
Storing Dried Bee Balm
Store your dried bee balm in an airtight container like a glass jar or sealed bag. Keep it in a cool, dark place to protect the aroma and color.
Label the container with the date so you know how old it is. Properly dried and stored bee balm can last 6 months to a year.
Avoid moisture and heat, which cause mold or loss of potency. If you notice any off smells or discoloration, discard the herb.
Follow my bee balm board on Pinterest.